How to Build a Rabbit Hutch

Having a rabbit inside your residence means that you have to construct a secure and comfortable home for it. Building a rabbit hutch will answer that problem. It is a very simple endeavor that you will love doing and your pet will love living in it.

Solder Iron

MATERIALS NEEDED IN BUILDING A RABBIT HUTCH

Solder Iron

The materials that you needed for this project are wire sheets, wire cloth, eight metals rods, hinges, formica sheet, two by four stock, staples and solder.

TOOLS

The tools needed are screw driver, wire snips, gloves, coping saw, staple gun and soldering iron.

STEPS IN BUILDING A RABBIT HUTCH

The usual size for a hutch should be 4 times the size of your pet. You can use different materials but do not forget that there are some smells that permeates from any pet. It is advisable to use metal instead of wood as the latter retains smell. But a wooden enclosure presents a more interesting aesthetic in an open area while a metal enclosure may be a favorable choice in a confined area.

A wire mesh is a terrific option for the roof and walls of the enclosure but do not utilize for the floor as it will be dangerous for the paws of your pet. A wire cloth is a better option than a wire mesh as it will also allow your pet's urine to filter out of the set-up. Use snips to carefully cut the flooring to the required size.

You can a wire mesh for the walls whether you use a metal or wood rod frame. But you should remember to use a soldering iron if you chose a metal frame and staple gun if you chose a wood frame for your pet's protection. Carefully lay down the frames that you have picked to use. Divide the frames to the size needed. For a metal frame, solder the side walls and then connect the front and back rods.

Determine the entrance location from same board or rod and place a rod on both sides of the entrance location. Build a door frame to match the entrance size. Screw the door hinges and door latch to the entrance and frame. For a frame made out of metal, place the mesh onto the hutch frame that you have made. Fix any bumps that you will see.

Secure the pair of corner points with a soldering iron. Normally, you will just need 2 pairs of wire wall: the entrance, roof and the wall of the floor. For additional floor protection, cut two by four stock to serve as the enclosure's feet. Secure it with staples.

Rabbits frequently urinate, so cut a portion of Formica to the size needed and insert it under the enclosure. You now have a place where your pet will enjoy living in for a long time.

How to Build a Rabbit Hutch
Solder Iron

Roku Player Samsung 40 Inch 1080P 120Hz 46 Inch Led Lcd Tv

Weller WM120 12w/120v Pencil Thin Soldering Iron

Special Price!!! Weller WM120 12w/120v Pencil Thin Soldering Iron

Oct 29, 2011 13:24:45

Weller WM120 12w/120v Pencil Thin Soldering Iron
Click for larger image and other views

Weller WM120 12w/120v Pencil Thin Soldering Iron

>> Click here to update Cheapest prices for Weller WM120 12w/120v Pencil Thin Soldering Iron <<

Weller WM120 12w/120v Pencil Thin Soldering Iron Feature

  • Lightweight, pencil thin soldering iron with stay-cool handle
  • Designed for soldering miniature components
  • Develops tip temperature of 800 Degree F
  • Comes with 6 foot cord and 3-wire grounded plug
  • Made in Mexico


Weller WM120 12w/120v Pencil Thin Soldering Iron Overview

WM120 Thin Pencil Soldering Iron 12W miniature, lightweight, pencil thin soldering iron. Weighs 7 oz. and measures 7" less tip. Tip temperature of 800°F. Uses MP series tips. (USA)


SAVE NOW on the special offers below!

Available In Stock.

This Weller WM120 12w/120v Pencil Thin Soldering Iron ships for FREE with Super Saver Shipping.

Price : Click to Check Update Prices Please.

Weller WM120 12w/120v Pencil Thin Soldering Iron

Limited Offer Today!! Weller WM120 12w/120v Pencil Thin Soldering Iron Black Friday and Cyber Monday Deals

Non Stick Cookware Samsung 32 Led Lcd Saw Bench

TEKTON 7266 30-Watt Soldering Iron

Special Price!!! TEKTON 7266 30-Watt Soldering Iron

Oct 27, 2011 21:19:36

TEKTON 7266 30-Watt Soldering Iron
Click for larger image and other views

TEKTON 7266 30-Watt Soldering Iron

>> Click here to update Cheapest prices for TEKTON 7266 30-Watt Soldering Iron <<

TEKTON 7266 30-Watt Soldering Iron Feature

  • Insulated Pencil-Type Polymer Handle
  • Replaceable Nickel Plated Tip
  • UL Listed
  • Complete with Tip Stand
  • General-Purpose Soldering Iron for Electronics Repair, Wiring Connections, Automotive Electrical System Repairs, and Circuit Boards


TEKTON 7266 30-Watt Soldering Iron Overview

MIT 30-WATT SOLDERING IRON features: Operates at 30-Watts Using 110-120 Volts, Insulated Pencil-Type Polymer Handle, Replaceable Nickel Plated Tip Heats to 700 degree, 5-1/2 Ft. Power Cord, UL Listed, Complete with Tip Stand, Use for Any Fine Soldering Project Including Electronic Repair, Speaker Connections, Computer Repairs, Hobbies, ect.


SAVE NOW on the special offers below!

Available In Stock.

This TEKTON 7266 30-Watt Soldering Iron ships for FREE with Super Saver Shipping.

Price : Click to Check Update Prices Please.

TEKTON 7266 30-Watt Soldering Iron

Limited Offer Today!! TEKTON 7266 30-Watt Soldering Iron Black Friday and Cyber Monday Deals

10 Tablet Pc Android Hd Digital Media Player

Weller WP35 35-Watt Professional Soldering Iron

Special Price!!! Weller WP35 35-Watt Professional Soldering Iron

Oct 26, 2011 21:46:42

Weller WP35 35-Watt Professional Soldering Iron
Click for larger image and other views

Weller WP35 35-Watt Professional Soldering Iron

>> Click here to update Cheapest prices for Weller WP35 35-Watt Professional Soldering Iron <<

Weller WP35 35-Watt Professional Soldering Iron Feature

  • Ideal For A Wide Variety Of Electronic Tasks
  • Uses St Series Long Life Double-Coated Iron-Plated Tips
  • Tip Temperature: 850°F
  • Quick-Change Knurled Collar and Stainless-Steel Barrel
  • Light Blue With Cushion Grip Handle and Plug-In Heating Element


Weller WP35 35-Watt Professional Soldering Iron Overview

Product Features: # Ideal for a wide variety of electronic tasks - has ST3 soldering tip # Uses ST series long life double-coated iron-plated tips # Tip temperature: 850°F # Quick change knurled collar - stainless steel barrel # Light blue with cushion grip handle and plug-in heating element # 6' 3-wire cord - iron is 7 7/8 long # IMPORTANT: Use only Weller® tips # UL and cUL listed (120 VAC units only)


SAVE NOW on the special offers below!

Available In Stock.

This Weller WP35 35-Watt Professional Soldering Iron ships for FREE with Super Saver Shipping.

Price : Click to Check Update Prices Please.

Weller WP35 35-Watt Professional Soldering Iron

Limited Offer Today!! Weller WP35 35-Watt Professional Soldering Iron Black Friday and Cyber Monday Deals

Dewalt 18V Cordless Weight Loss Vitamin

Make a Solder Free Stained Glass Box

Solder free stained glass boxes are fun to make. You can make these boxes to hold jewelry, mementos, or anything else you want. Their size can be customized to your need or space. In just an hour, you can make one of theses boxes.

Solder Iron

To make a square or rectangular box, cut a piece of glass or mirror for the bottom of the box. The size of this piece will be the size of the box you want to make. To cut the sides of the box, first determine how deep you want the box. Then cut 2 pieces of glass that is the same length as the glass you cut for your bottom piece by the height you desire. Then cut 2 more pieces, the width of the bottom piece minus 1/4 inch (the thickness of the glass times 2) and by the same height you cut the other two pieces. The last 2 pieces you need to cut is for the top of the box. Using the bottom glass for you pattern, cut one piece of glass that is 1/2 inch bigger on all four sides and one piece that is 1/4 inch smaller on all four sides.

Solder Iron

Once all your pieces are cut, lightly grind all the edges. Then clean and dry all the pieces and you are ready to assemble your box. To assemble box, you will need Weldbond glass glue. It is strong and it dries clear.

Using a thin line of glue on the edges of the side glass and attach them to the outer surface perimeter of your bottom piece. Do this one piece at a time. If excess glue squeezes out, use a damp q-tip to wipe off excess. Once all four sides of your box are glued, set it aside to dry. To make the top of your box, center the smaller top piece on the larger top piece. Use only a few small dots of glue to adhere these two pieces together. Let all pieces thoroughly dry (24-48 hours).

To embellish the top of your box, you can attach glass nuggets or whatever else you would like.

Make a Solder Free Stained Glass Box
Solder Iron

Black And Decker Power Drill Digital Video Player Panasonic Home Theater

Soldering Iron Holder

Special Price!!! Soldering Iron Holder

Oct 24, 2011 08:59:15

Soldering Iron Holder
Click for larger image and other views

Soldering Iron Holder

>> Click here to update Cheapest prices for Soldering Iron Holder <<

Soldering Iron Holder Feature

  • Holder w/ Sponge


Soldering Iron Holder Overview

Soldering Iron Holder


SAVE NOW on the special offers below!

Available In Stock.

This Soldering Iron Holder ships for FREE with Super Saver Shipping.

Price : Click to Check Update Prices Please.

Soldering Iron Holder

Limited Offer Today!! Soldering Iron Holder Black Friday and Cyber Monday Deals

Drill Bosch Hdtv Lcd Vizio

How to Solder For Radiator Repair

Radiator is a dynamic and an imperative to regulating the car's temperature low like perspiration, which is the body's ability to keep you refrigerate. The auto radiator uses ambient air to cool down the coolant that flow through, it is usually at the front of the vehicle. Automobile radiators are either made up of aluminum or brass and copper. Plastic could also be used for the tanks at either ends. The radiator repair techniques may differ, depending on the automobile and other material.

Solder Iron

There are two main kinds of radiators; one is cross flow and the other is vertical flow. You need to locate the tanks. Whether they are at the top or bottom, then it is a vertical flow. If they are on the sides, then it is a cross flow. You need to check the tanks if they are made of metal or plastic. The radiator construction material must be determined. The radiator must be made of brass or copper if it is painted. If it is shiny like chrome, the radiator is made of aluminum.

Solder Iron

Repair could be done many times, if the damage to the radiator is not wide-ranging and extensive. The repairs could be done many times by soldering. Soldering is not like welding or brazing as it does not bond together the two models physically, but it is a similar patch, which is considered to be a pleasant one. Welding is considered to be necessarily better and gives an improved outlook. As much as the solder repair is of a good quality, the bond for the radiator could last for the lifetime.

There are specific instructions that could be followed;

The first step is to make the damaged and fragmented area ready for soldering. This involves removing the paint with a wire brush, or by using a small grinding wheel along with removing any sharp edges or burrs that might occur. You must be careful, not to make the damage grow worse, if you are using a grinder, as the radiators are made up of ultra-light material. You can then clean the area with strong solvents like brake or Green cleaners, so that the fuse support and stay with the radiator without causing any problems.

The next step is that you should solder the damaged and troubled area thoroughly. You must use a high-wattage soldering solid wire or metal. You need to heat up the gun carefully to get the solder melt down and bonds with the surface of the radiator. Then heat up the damaged part of the radiator along the soldering iron, introducing the wire slowly with it, try not to drip the solder itself into the radiator. After that, slow down the work when you get down the crack until and unless it is fully covered with the solder. You must always remember to unplug the tool when you are done with soldering, as most of them do not turnoff themselves.

Third step is to drudge the solder has no sharp edges or burrs. This could be done with a wire brush or a small wheel. The concept behind is to make the solder line as easy as possible and also to remove the contaminants, if any are there. The repaired portion could be left alone or even repainted. You are required to fill the radiator with the coolant, which would allow the car get the operating temperature low, keeping your eyes on the soldered area for leaks.

How to Solder For Radiator Repair
Solder Iron

Special Price!!! Weller D550PK 120-volt Professional Soldering Gun Kit 260/200 Watts

Oct 23, 2011 07:46:39

Weller D550PK 120-volt Professional Soldering Gun Kit 260/200 Watts
Click for larger image and other views

Weller D550PK 120-volt Professional Soldering Gun Kit 260/200 Watts

>> Click here to update Cheapest prices for Weller D550PK 120-volt Professional Soldering Gun Kit 260/200 Watts <<

Weller D550PK 120-volt Professional Soldering Gun Kit 260/200 Watts Feature

  • Fingertip trigger selects high (260-watts) or low (200-watts) for controlled output
  • Designed with pistol grip for comfort and ease of use
  • Features twin lights to illuminate your work
  • Heats up quickly; ready to use in only 6 seconds
  • Includes an assortment of accessories in a molded plastic storage case


Weller D550PK 120-volt Professional Soldering Gun Kit 260/200 Watts Overview

Soldering Gun Kit 260/200W Soldering Gun With Tin Plated Copper Tip 2 Untinned Tips fluxbrush Soldering Aid Tool Coil 40/60 Rosin Core Solder Plastic Carry Case Soldering Hints Booklet.


SAVE NOW on the special offers below!

Available In Stock.

This Weller D550PK 120-volt Professional Soldering Gun Kit 260/200 Watts ships for FREE with Super Saver Shipping.

Price : Click to Check Update Prices Please.

Weller D550PK 120-volt Professional Soldering Gun Kit 260/200 Watts

Limited Offer Today!! Weller D550PK 120-volt Professional Soldering Gun Kit 260/200 Watts Black Friday and Cyber Monday Deals

Air Power Tool Vizio 47 Lcd

Technicians Tool Kits - These Aren't Your Father's Tools

The Term Technician Tool Kit is in my opinion such a broad term that could cover many aspects of Electronic Tools today. There are many different things to consider when making a purchase of this magnitude, especially when it deals with Electronic Tools that you will most likely be using daily as part of your new profession. I will not go into great depth on all of the different Technician Tool Kits that you could purchase, instead I will touch briefly on some of the more popular Electronic and Technician Tool Kits used today.

Solder Iron

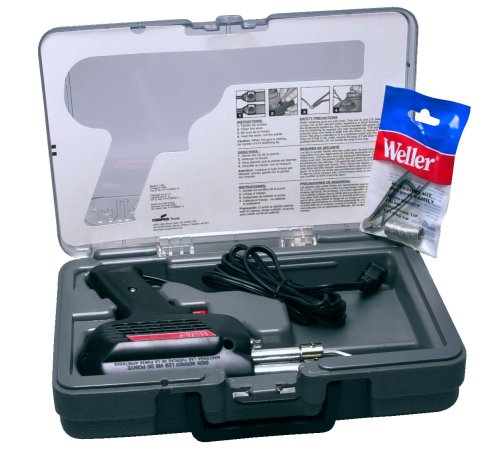
The first Tool Kit I purchased was one that I personally used when attending school for Electronics. It came with a good 60 watt Soldering Iron and a Desoldering Tool. As an apprentice I think I probably went through twice as many Desoldering Tools than any other tool in the Tool Kit. Of course this Educational Tool Kit also included a student calculator, a professional Analog Multimeter, and other basics like pliers and cutters. It was moderately priced and had all of the essentials for the Electronic Student.

Solder Iron

Once you have graduated from Electronic training wherever that may be, you will have most likely chosen your favorite part of the Electronic Field in which you want to make a profession of. At this point you will most likely find that although the Electronic Tools you used while studying Electronics were quite adequate at the time, they will not be enough to continue with in your new founded career as an Electronic Technician.

If you will be working in the field of Computer Technology you may find it necessary to purchase specialized tools for repairing computers. While in other instances you may not only be servicing
computers, but you may also be involved with networking as well. In that case you may also want your Technician Tool Kit to includes test equipment like Lan Testers, Stud Finders and specialized Crimping and Networking Tools.

Telecommunications has become the industry of this century. The Technician Tool Kit for computers is certainly not going to contain all of the tools necessary to work on Telecom Equipment. In my opinion there are two choices when it comes to purchasing a Telecom Tool Kit and the choice you make should be based on whether you are Installing Telecom Equipment, or if you are repairing Telecom Equipment.

If your talents take you in the direction of installing Telecom Equipment then you need to start with a professional quality Butt Set. This will be the heart of your Telecom Tool Kit, so money spent here on a better quality Butt Set up front will save you time and money in the future. Along with a good Butt Set you should consider a professional grade Tone Generator as well. Both the Tone Generator and the Butt Set will be the heart of your Telecom Tool Kit, so don't skimp here, remember your tools reflect to your customer the quality of the work you do, long before you ever complete the job. Your Telecom Tool Kit should also include a good set of screwdrivers, pliers, cutters and punch down tool that will have interchangeable blades.

Now on the other hand if you are considering repairing Telecommunication Equipment then you should seriously consider purchasing what is called a Communications Tool Kit. It
includes a Butt Set, Tone Generator and Punch Down Tool, but will also include tools like Nut drivers, Precision Screwdriver Sets, Tweezers, Flashlight, Adjustable Wrenches and Electricians Scissors.

Service Technicians also require a specialized Tool Kit. Generally you will find included in these types of Tool Kits a professional grade Digital Multimeter, Security Screwdriver Set, Professional Grade Soldering Iron, Mini Vacuum Cleaner, Voltage Test Screwdrivers, Inspection Mirror and Wire Stripper.

Now needless to say these Technician Tool Kits contain many other Electronic Tools in them, but there are far too many to list here in this article. I have tried in this article to recommend the most important tools found in each type of Technician Tool Kit to help give you a better understanding of the differences between
each one and the importance to take the time to choose the Technician Tool Kit that will best fit into the field of Electronics your talents happen to take you.

Technicians Tool Kits - These Aren't Your Father's Tools
Solder Iron

Special Price!!! Neiko 40420L Tooluxe Cordless Soldering Iron

Oct 22, 2011 00:01:32

Neiko 40420L Tooluxe Cordless Soldering Iron
Click for larger image and other views

Neiko 40420L Tooluxe Cordless Soldering Iron

>> Click here to update Cheapest prices for Neiko 40420L Tooluxe Cordless Soldering Iron <<

Neiko 40420L Tooluxe Cordless Soldering Iron Feature

  • Reaches 365 Fahrenheit or 185 Celcius immediately, also cools down instantly
  • Maximum temperature is 1050 Fahrenheit or 565 Celcius
  • Features with a white LED light at the tip, light up the spot
  • Equivalent to a 15W soldering iron
  • Uses 4xAA batteries (not included)


Neiko 40420L Tooluxe Cordless Soldering Iron Overview

This cordless soldering iron provides you with the soldering ability of a 15W soldering iron without the restrictions of having to be tied down by the cords. Instantle reaching 365 Fahrenheit and with a maximum temperature of 1050Fahrenheit, this soldering iron only uses 4 AA batteries so it produces a lot of heat with little power.


SAVE NOW on the special offers below!

Available In Stock.

This Neiko 40420L Tooluxe Cordless Soldering Iron ships for FREE with Super Saver Shipping.

Price : Click to Check Update Prices Please.

Neiko 40420L Tooluxe Cordless Soldering Iron

Limited Offer Today!! Neiko 40420L Tooluxe Cordless Soldering Iron Black Friday and Cyber Monday Deals

Sharp Projector Bulbs

Aoyue 937+ Digital Soldering Station

Special Price!!! Aoyue 937+ Digital Soldering Station

Oct 21, 2011 00:02:18

Aoyue 937+ Digital Soldering Station
Click for larger image and other views

Aoyue 937+ Digital Soldering Station

>> Click here to update Cheapest prices for Aoyue 937+ Digital Soldering Station <<

Aoyue 937+ Digital Soldering Station Feature

  • Long Life Ceramic heat Element
  • Digital thermostat control ± 1° C
  • 24 volt output to prevent circuit damage
  • 45 watt Power consumption
  • Temperature range 200-480° C (392-897° F)


Aoyue 937+ Digital Soldering Station Overview

This is a 45 watt digital soldering station that has a 1 degree C control.Features:ESD SafeLong Life Ceramic heat ElementDigital thermostat control ± 1 C24 volt output to prevent circuit damageTemperature lock50 watt Power consumptionTemperature range 200-480 C (392-897 F)110 V ACPackage content:937+ station, B001 Soldering iron, 2630 Soldering iron holder, C001 Soldering iron spare heating element. Solder is not included with this item


SAVE NOW on the special offers below!

Available In Stock.

This Aoyue 937+ Digital Soldering Station ships for FREE with Super Saver Shipping.

Price : Click to Check Update Prices Please.

Aoyue 937+ Digital Soldering Station

Limited Offer Today!! Aoyue 937+ Digital Soldering Station Black Friday and Cyber Monday Deals

Projector Multimedia Damiana Extract

Sinometer 30 Watts Soldering Iron, UL listed

Special Price!!! Sinometer 30 Watts Soldering Iron, UL listed

Oct 19, 2011 20:40:17

Sinometer 30 Watts Soldering Iron, UL listed
Click for larger image and other views

Sinometer 30 Watts Soldering Iron, UL listed

>> Click here to update Cheapest prices for Sinometer 30 Watts Soldering Iron, UL listed <<

Sinometer 30 Watts Soldering Iron, UL listed Feature

  • Long life replaceable tip
  • 30 Watts and UL listed
  • Stand included
  • Impact resistance handle
  • 30 days money back guarantee and 1 year limited warranty


Sinometer 30 Watts Soldering Iron, UL listed Overview

This professional 30 watt soldering iron features a replaceable tip, ergonomically designed cool grip rubber handle, and a nickel-iron plated long life copper tip. It provides an operating tip temperature of up to 430 F with fast heating time and quick heating recovery. 120 VAC.


SAVE NOW on the special offers below!

Available In Stock.

This Sinometer 30 Watts Soldering Iron, UL listed ships for FREE with Super Saver Shipping.

Price : Click to Check Update Prices Please.

Sinometer 30 Watts Soldering Iron, UL listed

Limited Offer Today!! Sinometer 30 Watts Soldering Iron, UL listed Black Friday and Cyber Monday Deals

Home Video Projector 32 Lcd Led Butane Heat Gun

American Terminal AT-31604 60-40 Rosin Core Solder (4 Ounces)

Special Price!!! American Terminal AT-31604 60-40 Rosin Core Solder (4 Ounces)

Oct 18, 2011 20:15:07

American Terminal AT-31604 60-40 Rosin Core Solder (4 Ounces)
Click for larger image and other views

American Terminal AT-31604 60-40 Rosin Core Solder (4 Ounces)

>> Click here to update Cheapest prices for American Terminal AT-31604 60-40 Rosin Core Solder (4 Ounces) <<

American Terminal AT-31604 60-40 Rosin Core Solder (4 Ounces) Feature

  • Fine electrical soldering
  • 60-Percent tin and 40-percent lead
  • 376 Degree F melting point
  • 0.062 Diameter. 4-Ounce
  • For fine electrical soldering requiring lower melt temps
  • 1/16" diameter
  • 60% tin, 40% lead
  • Leaded rosin flux core
  • 4-ounce spool


American Terminal AT-31604 60-40 Rosin Core Solder (4 Ounces) Overview

This spool of American Terminal AT-31604 Solder contains 4 ounces of 1/16" solder with a leaded rosin flux core. The 60% tin, 40% lead combination is perfect for jobs like fine electrical soldering which requiring lower melt temperatures.


SAVE NOW on the special offers below!

Available In Stock.

This American Terminal AT-31604 60-40 Rosin Core Solder (4 Ounces) ships for FREE with Super Saver Shipping.

Price : Click to Check Update Prices Please.

American Terminal AT-31604 60-40 Rosin Core Solder (4 Ounces)

Limited Offer Today!! American Terminal AT-31604 60-40 Rosin Core Solder (4 Ounces) Black Friday and Cyber Monday Deals

Protein Whey

How to Build a Solar Panel Fan in a Good Way

You need to understand that a solar panel is seen as a green power source that can convert energy from the sun into electricity. The presence of solar-powered fan is really good for the environment and its presence is able to save more money while keeping you cool during the summer months. In this case, it is an important for you to build a solar panel fan so you can be sure that it will be great for your needs. For more information, just check this article out.

Solder Iron

The first step you need to consider is to heat the soldering iron and keep the solder nearby. In this case, you need to do the right preparation that will support you to build this system so you can take benefits from it. Just be sure to do this process rightly.

Solder Iron

The next step you have to know is to solder the positive (red) wire coming from the fan to the positive wire coming from the capacitor. If you would like to do this, you just need to touch the two wires together while holding the soldering iron against them both. If you see the wires become hot, you need to touch the solder to the heated wires and utilize the soldering iron to shape it in place.

For another good step, it is an important for you to solder the positive wire from the solar panel to the positive wire on the capacitor also. In this case, you need to consider the use of additional solder while needed. If the panel has no protruding wires, the back is usually positive, and the front negative.

Also, it is better for you to solder the negative wire (black) from the fan to the negative wire on the capacitor in the same way described previously. In fact, this kind of process will help you to build the right system for your needs so you can take benefits from it. Just be sure that you do this process rightly so you can take benefits from it.

And then, you will be advised to solder the negative wire from the solar panel to the negative wire on the capacitor. You will be asked to use more solder while needed since the solder will support you to do your jobs very well. Also, it is advised to check the connections on the capacitor to make you sure about the security.

How to Build a Solar Panel Fan in a Good Way
Solder Iron

Special Price!!! Stahl Tools SSVT Variable Temperature Soldering Station

Oct 17, 2011 17:16:19

Stahl Tools SSVT Variable Temperature Soldering Station
Click for larger image and other views

Stahl Tools SSVT Variable Temperature Soldering Station

>> Click here to update Cheapest prices for Stahl Tools SSVT Variable Temperature Soldering Station <<

Stahl Tools SSVT Variable Temperature Soldering Station Feature

  • On/off switch with "power-on" indicator light
  • Variable heat setting
  • Cushioned rubber grip
  • Replaceable heating element
  • Quality performance at a discount price


Stahl Tools SSVT Variable Temperature Soldering Station Overview

The Stahl Tools variable temperature soldering station is designed to exceed the expectations of veteran technicians—at a price that's appealing to the electronics hobbyist. Many different soldering tasks are accomplished easily by using the adjustable 5 to 40 watt temperature adjustment. The lightweight pencil iron features a fatigue-reducing rubber grip, and a Bakelite-ringed holder keeps the iron at the ready. A field replaceable, precision ground, iron-plated solid copper tip provides maximum heat transfer, minimizing cold solder joints. Includes tip cleaning sponge. Additional tips available for a variety of soldering applications. Stahl Tools—The Technician's Friend™


SAVE NOW on the special offers below!

Available In Stock.

This Stahl Tools SSVT Variable Temperature Soldering Station ships for FREE with Super Saver Shipping.

Price : Click to Check Update Prices Please.

Stahl Tools SSVT Variable Temperature Soldering Station

Limited Offer Today!! Stahl Tools SSVT Variable Temperature Soldering Station Black Friday and Cyber Monday Deals

3.5 Sata External Enclosure Cd Music System Random Orbit

Heat Gun Safety Checklist - How Not To Burn Yourself

The multi-utilitarian heat gun is an extremely popular tool used in crafts, construction, the automotive industry and much more. To work the heat gun efficiently and safely, the instructions must be read thoroughly. Heat guns eject hot air which may even reach 1300° F; hence it is crucial to understand how to operate the heat gun so that precaution may be taken against the risk of serious burns.

Solder Iron

Heat guns are generally held in one hand while the other hand can be used to complete the task that is being undertaken. A mandatory safety measure is to wear gloves that provide protection from accidental burns. The gloves used should be able to resist burns and guard the hands from the hot air that blasts from the nozzle as it can easily be misdirected.

Solder Iron

Heat guns are often used to soften matter so that it can be molded into any shape desired or stuck to another object. During the heating process usually a lot of dangerous fumes are emitted so a well ventilated work area is essential. When painting or using adhesives most people forget the hazards of toxic fumes produced by these materials when they get hot. Hence a well ventilated room is desirable.

If the heat gun is used recklessly it may cause the handler severe burns. The heat gun may look like a hair dryer but is definitely not one, so it should never be directed at hair, skin or clothing for any cause. The heat gun must be handled with intense care and constant attention must be given to where the hot air is being directed otherwise it could lead to fatal accidents.

If one uses the heat gun responsibly then this tool can provide an immense number of benefits from its various uses. While using the heat gun you must be alert and agile because you do not want to end up with burns neither would you like your object to be burnt.

Heat Gun Safety Checklist - How Not To Burn Yourself
Solder Iron

Wd Mini Media Player

Tips on Making a Robot From Junk

Putting together a junk robot figure can be a nice way to recycle scrap metal and other junk. You can create a completely new and original creature just with a little touch of innovation. You can bring to use things like discarded tin cans, odd buttons, and useless appliances along with used laptop or refurbished laptop. With some unidentifiable objects of trash and a little imagination, you can take on a new life. You can design it as per your taste. All you need is a little bit of supervision, and you share some nice moments with your kids in the making of the junk robot.

Solder Iron

Of course, you will be needing junk, but there are some few more things that will help you to put together a junk robot. You will need soldering iron, duct tape, epoxy, nuts and bolts, paints, wires, etc. With all that collected; you can start by making the body. Here are some steps to do so.

Solder Iron

• Look for some items with which you will be making the torso. You can use old cans, tins or sardines or anything with a sufficient size to fasten a head, arms and legs to.

• Then you will be assembling the feet, arms and legs. Just like your legs should have feet wide enough to stand on, the robot also needs sufficient balance. Broken toy cars without wheels, lids from mason jars and other that are wide and flat can do a good job. For making arms and legs, you can make use of any junk material you like. Use antennas from old televisions or radios or otherwise forks and spoons, crescent wrenches and railroad spikes can also be some good items for this purpose.

• Now let us get started with the head. Collect junk parts for your robot's head. You can make the head out of a doorknob. Certainly, it will have a mouth and eyes. You can even attach a nose to make it look more like a human. For instance, you can use a wooden top with square bolts for eyes and a zipper for the mouth or you can use buttons as eyes and a strip of metal for mouth.

• Start assembling your robot using a duct tape. Cut slits in the torso using tin snips and then you can easily stick the head and limbs in to them. Then with the help of epoxy or solder, neatly join the pieces together.

• Then comes the time to decorate your robot. Use metallic spray paint throughout. It will cover up any imperfections or rusty spots. Furthermore, this paint will give your junk robot a classic cyborg finish. Most definitely, you do not want your robot to look like a heap of junk. For the purpose, you can add pieces of colored plastic, tinsel or anything else that can make your robot look more awesome.

You can curtail off or add some more steps according to your knowledge and requirements. The final appearance of your junk robot will be amazing if you follow these steps appropriately.

Tips on Making a Robot From Junk
Solder Iron

Special Price!!! SE Soldering Station with Helping Hand, 2 1/2" Dia. Lens

SE Soldering Station with Helping Hand, 2 1/2
Click for larger image and other views

SE Soldering Station with Helping Hand, 2 1/2

>> Click here to update Cheapest prices for SE Soldering Station with Helping Hand, 2 1/2" Dia. Lens <<

SE Soldering Station with Helping Hand, 2 1/2" Dia. Lens Feature

  • 2½" Diameter
  • Glass Lens
  • Power 2X


SE Soldering Station with Helping Hand, 2 1/2" Dia. Lens Overview

SE Soldering Station with Dual Helping Hands Station has chrome Solder Iron Holder Solder Iron Tip Cleaning Sponge and Water Resevoir Magnifying Glass 2½ in. Diameter Glass Lens Power 2X


SAVE NOW on the special offers below!

Available In Stock.

This SE Soldering Station with Helping Hand, 2 1/2" Dia. Lens ships for FREE with Super Saver Shipping.

Price : Click to Check Update Prices Please.

SE Soldering Station with Helping Hand, 2 1/2

Limited Offer Today!! SE Soldering Station with Helping Hand, 2 1/2" Dia. Lens Black Friday and Cyber Monday Deals

Touch Screen Display Monitor

Tips and Issues - Joining Brass to Steel and Other Metals in Artwork

In metal art one of the coolest metals to work with is brass. It has a golden color and is stronger than copper yet melts or softens at a somewhat lower temperature. The golden color does darken with time but this easily remedied with copper/brass polishes. Brass is a copper/zinc alloy that has other metals added to contribute specific properties to the alloy depending on its end use. There are over 400 brass alloys in use. The most common brass available is 260 cartridge brass. This is called this since it is used for casings on ammunition. It is the cheapest brass and has a brilliant yellow color when clean and polished.

Solder Iron

One problem I encountered early on in my artist endeavors was trying to brazing brass to steel or to brass for that matter with ordinary bronze brazing rod. Problem with this is your common brass has a melting point approximately the same as your brazing rod. That is somewhere in the 1700 to 1800 Fahrenheit neighborhood. Another peculiarity about heating brass is that it does not "flow" or liquefy like bronze, silver or iron for that matter. At bright red heat it oxidizes extensively and gets a coating of black,green, and brown oxides. Whats more, is that if you are not diligent when heating the brass, after the oxidizing begins the metal will either collapse into a puddle or shrivel into a hideous form similar to what aluminum does. Another dilemma is that you may inadvertently burn a hole in the brass if it is a relatively thin plate or sheet metal.

Solder Iron

One solution would be to use ample supply of flux to dissolve away oxides as they form. But a better and simpler solution is to use a brazing or soldering alloy at lower temperatures. Ideally, one would use one of the quality silver bearing brazing alloys yet these are prohibitively expensive for most artists.

An inexpensive alternative is copper/phosphorus brazing alloys. These melt at about 1300 Fahrenheit and the joints are stronger than the parent metals. There is one caveat of coarse. That is you cannot use them with ferrous alloys. The reason being the phosphorous from the brazing alloy will form extremely brittle phosphides with the iron possibly causing joint failure. One way to get around this is to braze "copper coupons" to the steel and use the copper/phosphorus rods to braze the copper to the brass. This mainly applies to joining brass sheet to steel sheet or rod or vise/versa where the copper joining is hidden. If you wish to join brass rod to a steel rod where the joint will be clearly visible from all angles then soldering with lead/tin solder might be the best bet. More on this later.

Tips and Issues - Joining Brass to Steel and Other Metals in Artwork
Solder Iron

Special Price!!! Weller WEL8200PK 120-Volt 140/100 Watts Universal Soldering Gun Kit

Weller WEL8200PK 120-Volt 140/100 Watts Universal Soldering Gun Kit
Click for larger image and other views

Weller WEL8200PK 120-Volt 140/100 Watts Universal Soldering Gun Kit

>> Click here to update Cheapest prices for Weller WEL8200PK 120-Volt 140/100 Watts Universal Soldering Gun Kit <<

Weller WEL8200PK 120-Volt 140/100 Watts Universal Soldering Gun Kit Feature

  • All-Purpose, 120V Soldering Gun
  • Dual-Heat Gun Produces 140W Or 100W With Pistol Grip Design
  • Fingertip Trigger Selects High Or Low Output
  • Ready To Use In 6 Sec
  • High-Efficiency, Tin-Plated Copper Tip


Weller WEL8200PK 120-Volt 140/100 Watts Universal Soldering Gun Kit Overview

Type: Single
Wattage: 140 W/100 W
Temperature Range: 1020° F/900° F
Cord Length: 6 ft.


SAVE NOW on the special offers below!

Available In Stock.

This Weller WEL8200PK 120-Volt 140/100 Watts Universal Soldering Gun Kit ships for FREE with Super Saver Shipping.

Price : Click to Check Update Prices Please.

Weller WEL8200PK 120-Volt 140/100 Watts Universal Soldering Gun Kit

Limited Offer Today!! Weller WEL8200PK 120-Volt 140/100 Watts Universal Soldering Gun Kit Black Friday and Cyber Monday Deals

3.5 Hdd Enclosure Sata 32 Hdtv Lcd Tv